|
All
of my cameras
need to deliver outstanding image quality, especially in low light as
museums are often dimly lit and flash use is forbidden. Canon users
might dispute this, but I think Nikon has the best digital noise
control of any
camera manufacturer. Their noise control algorithms are better compared
to all
competitors. This comes especially apparent when cropping. Other
manufacturer's
noise reduction algorithms look "smeary" and unnatural to me. A
notable exception is the Fuji X100, a small rangefinder like camera
with an
excellent fixed 35mm (equivalent) f2 lens that performs very well in
low light.
It is a joy to use as a small inconspicuous camera for situations a big
DSLR is
not an advantage.
The reason I'm so focused on high ISO performance is simple. Along with
lens
performance, high ISO performance is THE dividing factor between
cameras and
manufacturers nowadays. In low ISOs up to 400 ISO pretty much all
cameras on
the market perform well, especially DSLRs. No matter what DSLR you will
choose,
if your photography does not require ISOs above 800, you can be very
happy with
any DSLR manufacturer.
Just recently DSLRs reached levels of image quality that rival medium
format
film, at least with color photography. For me that was reached with
Full frame
DSRLs around the 25mp mark.
I do have to stress that I use some of my images commercially on stock
photography sites, so image quality like edge to edge sharpness, color
fringing, distortion, aberrations and high ISO performance are important to
me. While I'm trained in professional image editing with many years of
experience, I'm of the opinion that a photo should come well exposed
right of the camera in the first place if at all possible.
Cameras:
|
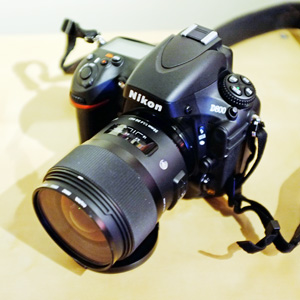
Nikon D800 DSLR,
36mp, full frame image sensor. - This is my main camera. At the time of
writing this camera is the highest resolving DSLR on the market (but
wait a few months...)
This camera has outstanding image quality and its resolution is
comparable with medium format film cameras.
Combined with the right lenses, the image quality is
stunning. Even cropped to a DX equivalent, the image has still 15 Megapixel
resolution left.
One side effect of this camera is that its high resolution sensor has
extreme demands on the lenses used. If a lens performed great on
cameras with a lower resolution sensor, their flaws are now clearly
visible. In
order to use the D800 to the full potential of the 36MP sensor, only
the best lenses have to be used. Of course the image can be downsized
to less megapixels (then you will have the same results of a camera
with less resolution), but then there is no point of spending all the
money on such a high resolution camera. There
are only a handful of lenses on the market (at the time I’m writing
this in the beginning of 2014) that truly make use of the D800’s
resolution. And those lenses tend to be quite expensive. The
second side effect is that its file sizes are very big. 20mb for a
compressed jpg image will put a high demand on your computer hardware
if you want to achieve a good workflow in post processing. You also
have to think about bigger hard drives as storage will get full
quickly. Thank god external hard drives are plentyful and cheap so this
is not a big problem.
Lastly, the camera is very demanding on the photographer’s skills. The
high res sensor is more unforgiving with camera shake compared to other
DSLR cameras I have used before and is more comparable with older
Hasselblad cameras. This is not a big deal, but the photographer has to
adjust to a different style of shooting he/she might be used to. To
this day, many users on forums report that the camera has focus issues
as their photos are coming back not as sharp as they expected. I’m
convinced that 99% of those reported issues are not camera related.
They are are either the lens used or inproper shooting technique or a
combination of both. In
short, an owner of the D800 should know that the purchase price will be
doubled by the appropriate lenses if one wants to make use of the full
potential of the camera.
|
|
|
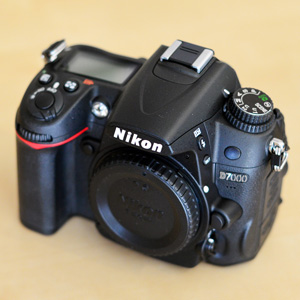
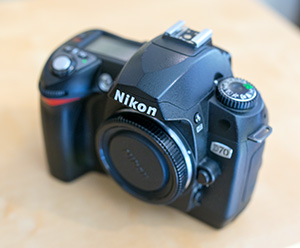
Nikon D7000 DSLR,
16mp, APS-C size sensor. - This is my backup camera in case the D800
fails, or
if I need more telephoto range.
|
|
|
Nikon D70 DSLR 720nm Infrared,
I found this camera for the
bargain price of $50 on a local classifieds site and couldn't pass it
up. Initially I wanted to flip it, but then I read an article about
infrared photography in archaeology and thought this would be an
interesting thing to explore. I ordered a custom 720nm Infrared filter
from Kolari Vision
and modified the camera. This is not an easy procedure as the camera
has to be completely disasembled and the autofocus re-calibrated. The
results are worth the effort. From an artistic point of view Infrared
photography delivers very interesting looks, in black and white as well
as in color. In archaeology infrared (or near infrared) photography can
reveal hidden details in rock or cave paintings or on ancient pottery
as some ancient paint is more reflective to infrared light. The main
application for infrared in archaeology is aereal photography.
Near
infrared photography is also used in analyzing old paintings as it can
reveal hidden layers of paint. This way art historians can get a closer
insight of a painter's techniques or a history of a painting. Click here to learn more about my Infrared conversion and infrared photography Check out the Flickr infrared group to get an idea what Infrared photography is about.
|
|
|
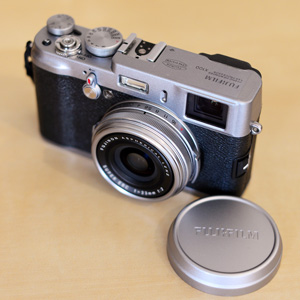
Fuji X100,
12mp, APS-C size sensor - The best small camera for casual photography.
The X100 has only one focal length. My favourite 35mm. The camera has
an almost inaudible shutter and is brilliant for situations where the
photographer has to be "stealthy". The camera has fantastic auto white
balance in artificial and low light. I think the auto white balance
in artificial light is the best on the market by a good margin.
Check out my Fuji X100 set on Flickr
If somebody would tell me that I have to travel around the world
but I can only take one camera and one lens, the X100 would be it.
The big advantage of the X100 compared to other high end compact
cameras like the Sony RX1 is it's excellent hybrid viewfinder. For
serious photography nothing beats a good optical viewfinder in my books
and the X100 has an excellent one. By the flip of a switch you can
activate the electronic viewfinder as well. This enables you to preview
an image in color (optical viewfinder) and black and white (electronic
viewfinder) with the flick of a switch in the fraction of a second.
Only the Fuji X100 and XPro-1 offer this feature.
|
|
|
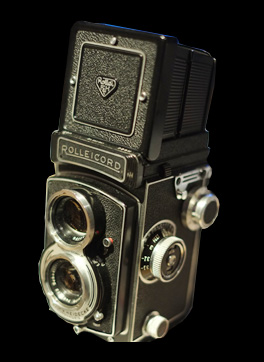
Medium format - Rollei
Photography
In my spare time I collect and restore vintage German Rolleiflex and
Rolleicord Medium format cameras. Occasionally I take one of them on my trips
as well. In some situations it is a
huge advantage to have one of those old cameras with you. First of all
you take photos on waist level, looking down. So people might not
realize that you are taking photos.
Shooting such an old camera always makes you look like a nerd and
nobody takes you seriously. You will always get a smile and people ask
you what this thing is.
Because of the big negative and the superb Zeiss and Schneider lenses
of the Rollei cameras, the image quality is outstanding. If Black and
White film like the Kodak TMax 100 is used, the image quality can still
not matched with digital in my opinion.
Certainly,
photography has moved on since the old film days, but especially the
Rollei cameras connect me with photography more then anything else.
Check out my
Rolleiflex/Rolleicord set on Flickr.
|
|
Lenses:
After
25 years of
photography, professional and recreational, I'm back to my roots and
only shoot
prime lenses. Image sharpness, contrast and distortion are much better
compared
to even the most expensive zoom lenses. I also find that photo
composition is
much more pleasant without having a zoom option as it forces me as a
photographer to think more about it. As mentioned, above lenses are the
main
dividing factor for image quality and they are MUCH more important than
camera
bodies. And if you want the best image quality you have to shoot the
best prime
lenses. I'd much rather shoot a 6mp Nikon D40 with a good lens than a
36mp
Nikon D800 with a bad one.
When
I'm shooting with Zoom lenses, I come home from a trip with 1000
photos, 100 'keepers' and 60 I can sell on stock photo sites. If I
travel with prime lenses, I take 500 photos, have 170 'keepers' and 150
I can sell. The
reason for this is that with prime lenses I have to slow down and think
about my picture composition more carefully. Therefore I take less
photos and get in turn more shots that I like. This also cuts down on
computer editing time which I consider a huge plus. My
prime lenses are carefully selected and of high technical quality. This
means that I have a higher acceptance rate on stock photo sites and
customers are more satisfied with the technical aspect of my work.
These days it is also important to deliver technically flawless photos
for stock photography retailers as there is lot's of competition. If
you don't believe that shooting prime lenses will improve your
photography and you think that you can't live without a Zoom lens, try
the following (this only works, if you are using a digital camera, of
course): Go back and sort out your favourite shots that you have taken
in the past and gather them in a folder on your computer. Now use your
favourite photo editing software to read out the EXIF information
attached to that photo. Check for the focal lenght and convert it to
the 35mm equivalent. I can pretty much guarantee that most of your
shots will be around the following values (give or take a couple of
mm): 24mm or 28mm (depending if your zoom lenses offered a 24mm
setting), 35mm, 50mm, 85 or 105mm and 180mm or above. You will be
amazed how accurate the values will be to those measurements. Most
likely most of your favourite shots will be around one specific focal
lenght. That is the focal lenght you should buy your first prime lens
for. Leave it on your camera and go out and shoot. After a while you
will not go back to your Zoom lens as the sharpness and contrast of the
prime lens will push the quality of your photos in a new direction.
|
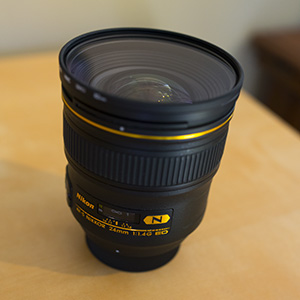
Nikon 24mm 1.4G -
ultra wide angle. This lens is one of Nikon's finest. Such a fast
aperture combined with the wide angle makes this lens stand out from
the crowd. I love available light photography and this lens is such a
great tool. This lens is one of the handful lenses that can actually
make use of the D800's high resolution sensor. The image quality is
extraordinary. Images are sharp from corner to corner at any aperture.
This lens is very expensive but the images it returns
are worth every penny in my opinion. Also on the D800 this lens
can be used as a 35mm lens in DX crop mode and still delivers a 16
Megapixel image. 24mm and 35mm are the most important focal lengths to
me.
|
|
|
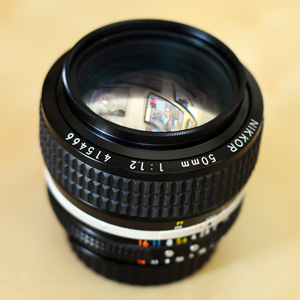
Nikon 50mm AiS f1.2 normal.
This lens is outstanding. In my opinion this is the best lens
for taking pictures in museums. Currently this lens is the fastest in
the Nikon
line up.
In production for over 25 years, it is also the only manual focus
Nikon
lens that is still sold new. This lens has several specialties that
make it one
of my favourites.
First, it reaches its peak performance at f2, an aperture most other
prime
lenses still struggle with sharpness. 99% of zoom lenses
don't even
offer this aperture.
Second, it's like having two lenses in one. From f1.2 to f1.8 the lens
has an
almost magical performance. It has wonderful Bokeh (Bokeh=The way a
lens
renders out of focus areas) and has a very dreamy rendering of the
image while
still being sharp. The effect is hard to describe and needs to be seen
to
be appreciated. At f2 and above the lens loses it's 'dreamy'
performance and is bitingly sharp up to the corners of the frame. I
tried all 50mm lenses on the market and in my opinion this is the best.
To top it all off, the lens' built quality is exquisit. The manual
focus is extremely smooth and a joy to use.
|
|
|
Tokina 100mm 2.8 ATX Pro telephoto/macro. In order to keep my
kit small and to cover the most situations possible, I came across this
fantastic lens. This is a fast macro lens that can be used a moderate
telephoto lens. I usually not a big fan of third party manufacturers,
but Tokina has a real winner with this lens. It's tack sharp at every
aperture and distance and it's close focusing capability of 1:1 at 30cm
distance is extremely versatile. The lens also features a pretty nifty
manual and auto focus clutch, that I have never seen on any other lens.
Pull the focus lever back and the lens is in manual focus mode, push it
towards the front and it will autofocus again. An excellent
solution.
|
|
|
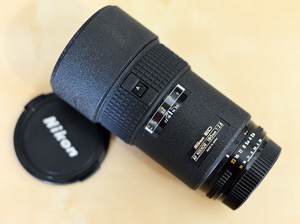
Nikon 180mm AF-S f2.8
telephoto. A fabulous Telephoto prime. Outstanding
sharpness at all f-stops. For such a fast lens, this Nikkor lens is
really
compact and lightweight. The fast aperture ensures fast shutter speeds
and good
separation between background and subject. In my opinion fast telephoto
prime
lenses are much more useful then slower lenses with image
stabilization. Image stabilization only helps if what you want to
photograph is holding still. For anything that moves, you need a fast
aperture. If Nikon has a "sleeper lens" that few people know about,
this would be it. The image quality it delivers outperforms many much
more expensive zoom lenses.
|
|
|
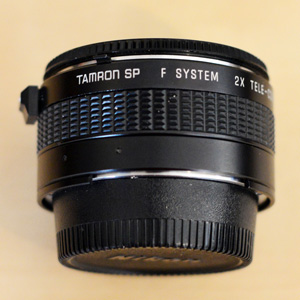
I
rarely use more than the 180mm telephoto focal length. For the rare
occasion I
do need more magnification I carry a Tamron SP 2x telephoto extender.
An older
unit, but one of the best optics Tamron ever made. This extender is
specifically made for fast apertures. As with every telephoto extender
you will loose about as much light as you gain magnification. This
means if this extender is 2x, you will loose half the light. If I use
my 85mm, f1.8 lens with this extender, I will end up with a 160mm, f4
telephoto.
|
|
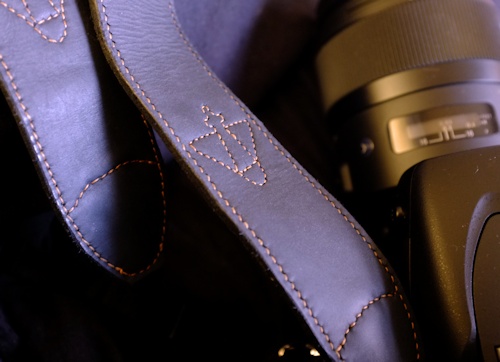
The Best Camera Strap in the World:
|
No matter what camera you
have - big or small - you have to have a good camera strap. And I have
the world's best! Sorry folks, but it's unique. It's custom hand made
by my sister Michaela, a master saddler and leather specialist.
I love it, look at the logo!
This strap is so well made, it will outlast all my cameras by a long shot.
|
|
Using
the APS-C
size backup camera in my bag, all the above focal lenghts multiply by
1.5. This
way I can cover every focal length from 20mm to 270mm. With the
Telefoto extender even up to 540mm, although I never needed that.
All of my gear including a small Laptop, a handheld GPS, a
strong
headlamp and other small items fit in a Thinktank Urban Disguise 50 V2
camera
bag. Inside this bag is a smaller Thinktank Digital Holster camera bag
that holds four lenses, the 24mm, 35mm, 50mm and 85mm. This smaller bag
can be
"undocked" if I don't want to carry the big bag that day. The Thinktank
Urban Disguise 50V2 can be converted into a backpack if needed or for
longer hikes.
For me my cameras are the most important thing on my trips and I always
laugh at people that have nice cameras, but leave them at home for
trips because they are "too heavy" while carring three suitcases or a
mega-backpack worth of clothes.
Here
some tips for buying a camera:
1.
Buy only a camera that you are willing to take with you. The most
expensive DSLR doesn't do you any good if it sits at home. If you never
used a camera as a hobby before and you think you "might would like to
get into it", chances are a DSLR is not for you. In my opinion you
can't just decide to take up photography as a hobby, it has to come
natural. A DSLR camera system is a commitment, you have to be willing
to "suffer" and carry a heavy bag with you.
2.
If you go the DSLR route and are on a budget, invest your
money in lenses,
not in camera bodies. A $500 camera with a $1000 lens delivers better
image quality then a $1000 camera body with a $500 lens. Furthermore,
lenses hold their value MUCH better then camera bodies. In fact the
best bargains are used camera bodies from people who found out that a
DSLR is not for them.
3.
If you think you can't commit to carrying a DSLR all the time, check
out the micro 4/3 systems. Those are small system cameras with
interchangeable lenses, that deliver very nice image quality, but weigh
a lot less. Another option is Fuji's excellent X System, like the
X-Pro1.
4.
Don't buy into the "Megapixel madness". Megapixels don't mean much it
just tells you how big a photo is. Sensor size is much more important.
I don't want to go into too much technical detail, but a bigger sensor
offers a greater pixel size and therefore better dynamic range. Dynamic
range is important to preserve details in shadow and highlight areas
and overall detail in a scene. Not too long ago only DSLR had bigger
image sensors, but that changed in recent years. So if you are looking
for a good camera, check out the image sensor first. Compact cameras
with small image sensors as well as cell- and tablet cameras deliver
images that can be 8 megapixels and larger, but the overall image
quality leaves a lot to be desired. You won't see a lot of difference
on the computer screen on a website, but if you want to print or crop
your photo, it will become apparent.
5.
It all comes down to the following: Do you love to take photos and do
you want to preserve your memories properly or do you just want photos
"in the moment". For the latter a cell phone or tablet camera will do
just fine and you don't have carry anything extra. There is a reason
that compact cameras are in decline. If you just want to share your
images on instagram or facebook, a cell phone camera is ok. I know some
people that take very nice photos on cell phone cameras, because they
have a good eye for photography. But the usage for those photos is
limited. Keep that in mind. 6.
If in doubt what DSLR to buy, because of budget considerations, make
the decision based on the lens, not the camera body. Meaning: Buy the
better lens and cheaper camera body not the other way around.
Image editing and photo tips:
Sometimes
if I read photography forums I'm feeling like pulling my hair out. It
seems that you are only able to take good photos if you have the latest
and greatest cameras. And the other way around if somebody has the
latest equipment, the photos MUST be good because of the camera.
Well, let me tell you. A photo is always taken by the photographer
never by the camera. The best hammer doesn't build you a house, it's
the person who uses the hammer.
Like the hammer a camera is just a tool, no matter what the camera
sales people want to tell you.
If
you don't like the photos you take with the camera you have now, you
will not improve them by buying a new camera. I can promise you that.
New computer image editing software doesn't help either unless you know
how to use it.
With the digital cameras of today, image
editing on the computer and cameras are very connected. That wasn't
always like that. During the film days you had to have excellent
technique with your camera as image editing after the fact was very
limited. Although I'm a digital photographer for many years I'm still
of the mindset that a photo should already come as close to my disired
vision out of the camera as I can get it. I think that every hour I sit
in front of the computer, I could be out shooting. Sometimes image
editing is not avoidable, of course.
It's not easy to give a few tips that will help you in a few short
sentences as every image is different. It takes years to perfect image
editing skills. I myself did a two year apprenticeship as a
"reprograph" in the 1990s as part of my studies and do image editing
professionally every since. You can believe me when I tell you I learn
something new every day.
The key to image editing is not to overdo it. Many beginners make the
mistake of "over editing". This will result in unnatural looking
images. Mistakes I often see is over-sharpening and the overuse of
equalizing the image by pushing the shadows and pulling the highlights.
The worst tendency in recent years is the awful over use of HDR. My
advice is to stay away from it as people WILL get sick of the effect
and in a few years your images will look badly outdated. A little HDR
to correct minor lighting errors is ok.
Some
quick tips for taking better photos:
1.
Compose using the rule of thirds.
2.
On sunny days, use a polarizing filter on your lens. This is the single
most important thing you can do to improve the look of your photos. It
will shorten your time you have to edit your images on the computer
significantly. Polarizers will improve contrast, reduce flare and make
colors more vivid, lie nice ble skies.
3.
If you are a beginner it's much better to invest money in a photography
course or image editing course then spending it on better camera gear.
4.
Many photos are ruined by improper shooting and camera holding
technique. In 1928 Oscar Barnack - the inventor of the Leica camera and
the first useable small camera - found out by trail and error that it
is much better to hold a camera close to the face and the body and look
through an acutal viewfinder instead of holding it away from your body.
Holding the camera closer allows you to reduce camera shake especially
if you have to use slower shutterspeeds. What was true in 1928 is still
valid. Unfortunately camera manufacturers omit viewfinders nowadays in
most models that aren't DSLRs. Almost a hundred years of camera
development and now this step backwards. Even more reason to shoot a
DSLR.
Image
editing software:
There
is excellent image editing software available, so you have a choice. If
you don't want to spend money, I recommend the open source image editor
The Gimp.
This software is excellent and can compete with the best for-pay
software in many respects. Unbelieveable that it doesn't cost you a
cent!
My
recommendation for your consideration and the software I use the most
is Paint Shop Pro X6 ultimate
from Corel. For ~$80 it is unbeatable in features. It even comes with
many plug-ins, you would have to pay extra as a photoshop plug-in.
Paint Shop Pro was always in the shadow of Photoshop, but there is
nothing you can't do with it just as good. I find some of the
algorithms even better than Photoshop.
After
almost 15 years of using Adobe Photoshop since version 3.0, I no longer
support Adobe Photoshop software. Their new policy of software rental
on a month to month basis is not acceptable business practice for my
taste. In fact, I'm so p**** off about those new business practice,
that I'm slowly replacing all my Adobe software with other
alternatives. Which works quite well, by the way.
Try Paint Shop
Pro X6 instead and save yourself some money. The last Photoshop version
that you could actually buy to own was Photoshop CS6. If you can hunt
down a used version, get it if you think you can't live without
Photoshop. If it has
to be Adobe you could also look into Adobe Photoshop Elements 12 that
is still available for purchase and it offers good value for the price
of around $100. All the main functions of Photoshop are there, more
advanced tools like curves are missing though. Again Paint Shop Pro X6
is the better choice as it features most of the advanced functions of
Photoshop. Adobe bundles it's Camera Raw converter with Photoshop
Elements so if you shoot RAW, it is a good development software for the
price. If you get the excellent DxO Optics pro RAW converter for, DxO
View Point along with Paintshop Pro X6, you have a package that costs
not even half of one year of Photoshop membership, is more powerful in
many respects and you can use it forever. Sounds like a no-brainer to
me.
Taking
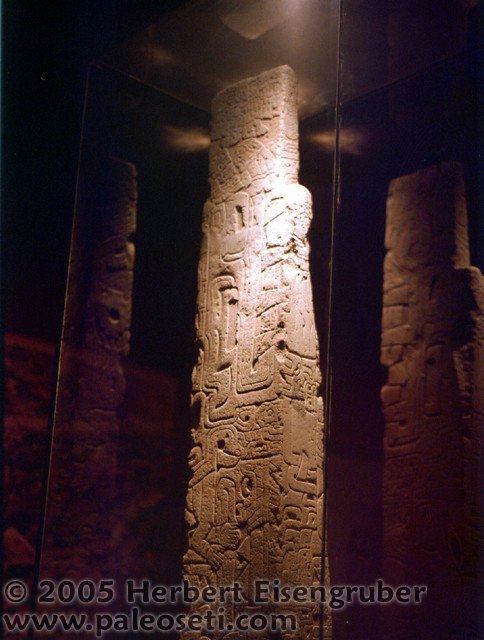
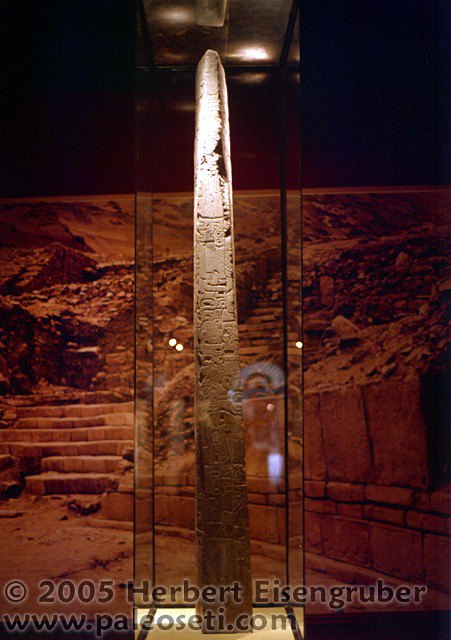
photographs in museums without flash:
In
most museums you are not allowed to use the camera's flash. And that's
good since bright flashes will over time damage the artifacts. Flash
also creates nasty shadows that are not desirable in photographs. When
I teach photography courses the first thing I teach my students is how
to turn of the flash. For that you have to take your camera out of the
automatic mode and learn how to control some of the camera's settings
yourself. Three settings are essential for taking photos:
1. Shutterspeed
- determines how long light falls onto the image sensor. Times are
usually measured in fractions of a second, so if your camera displays a
shutterspeed of 250, it actually means a 1/250th of a second. If the
shutterspeed falls below 1/100 you are in danger to get a blurry image
because of camera shake. Experienced photographers are able to take
good photos with shutterspeeds as low as 1/10 of a second, but they
will not be as sharp as they would like the photos to be.
2. Aperture
- determines hom much light falls onto the image sensor. Also controls
the depth of field. This is also calles the f-stop. The aperture is
comparable with the pupil in your eye. Smaller values indicate a
smaller aperture (pupil) which means the amount of light entering is
smaller with f16 compared to f2.
3. ISO speed -
determines the image sensor's sensitivity to light. The higher the ISO
number, the more sensitive the sensor is to light. But higher ISO
values also means an increase in digital noise and a loss of color
accuracy and image detail.
It's important to know that
those three settings influence each other, e.g. if you increase your
ISOs you will increase your shutterspeed OR decrease your aperture
depending on the mode your camera is in.
In museums you don't have a lot of light. and those
are always challenging environments. What works in our favour is that
items in museums tend to hold still, so motion blur is not a problem.
Low light means slow shutterspeeds which in turn can mean blurry
images. The way to counteract this is to let as much light into the
camera as possible by increasing the aperture (decreasing the f-stop).
That's when it becomes important what lens you use. A usual kit lens
that is bundled with an average DSLR has maximum apertures of f3.5 to
f4.5 which is not a lot. A lens with an f-stop value of 1.8 can let 5
times more light in and can therefore increase the shutterspeed. That's
why the lenses I use (see above) have f-stops of f2 or faster.
Now I realize that not everybody has thousands of dollars to invest in
camera gear. If you have a DSLR with a simple kit lens that opens it's
aperture to a maximum f3.5, you can still get decent images in museums.
You can utilize the variable ISO settings that digital cameras offer.
By increasing your ISO value you will increase you shutterspeed. It is
not unusual that in museums ISO speeds of 1600 and above are required
to get a good image. Modern DSLRs perform well with high ISO settings
but it depends on the make and model.
The single most effective ways to get better images in
museums is the investment in a fast 50mm prime lens of an f-stop of
1.8. So lenses can be had used for under $100. If you are a Nikon user
the 50mm f1.8D lens is highly recommended and costs new $125 ($80 used)
Some museums are so dark that even the best lenses and
ISO values don't help anymore. I have been to places were even my high
end gear met it's match. The anthropology museum in Quito, Ecuador was
such a place. In those situations, you have learn proper photographic
techniques:
Photographic techniques:
A heavy camera helps a lot with holding still. That's why
professional photographers use big cameras.
In a DSLR camera the mirror flips up right when you press the shutter
button. This creates shake that comes into effect when you have to use
slow shutter speeds.
Modern DSLR have live view which already flips the mirror up. But to
take a photo in life view you have to hold the camera away from your
body which is a bit of a trade of. The closer you hold a camera to your
body the steadier you can hold it.
One technique that always served me well ever since the times of film is
to utilize the camera's self timer. By doing this you eliminate the
vibrations that are created by pressing the shutter button.
Engage
the self timer, compose the picture, brace yourself against something
sturdy (if possible), press the shutter button, take two slow, deep
breaths and wait. Before the shutter will be engaged by the timer, hold
your breath and be stand as still as possible. Wait for the click of
the shutter.
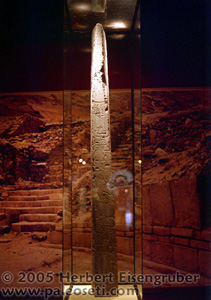
With this technique you can get great results. Here some examples taken with an old Nikon FM2 film camera with 50mm f1.8 lens:

ISO
200, f1.8, shutterspeed 1/4sec
|
ISO
200, f1.8, shutterspeed 1/4sec
|
|
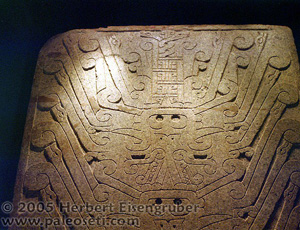
ISO
200, f1.8, shutterspeed 1/8sec
|
|
|